

Choosing the Best Breast Milk Bags: A Comprehensive Guide for New Parents

If you’re new to parenting, figuring out how to store breast milk can feel like one more thing on an already long list. There are so many options for breast milk bags, and it’s not always clear which ones are worth your money or how to use them right. This guide is here to help you sort through the choices, understand what matters most, and make storing your milk as easy as possible. Whether you’re heading back to work or just want to have a backup stash, you’ll find simple tips and real-life advice for choosing and using breast milk bags.
Key Takeaways
- Choose breast milk bags made for milk storage, not regular food bags.
- Look for bags with strong seals to avoid leaks, especially in the freezer.
- Label every bag with the date before storing to keep track of freshness.
- Don’t fill bags all the way—leave space for milk to expand when frozen.
- Never thaw or heat breast milk in the microwave; use warm water instead.
Understanding Breast Milk Storage Bags
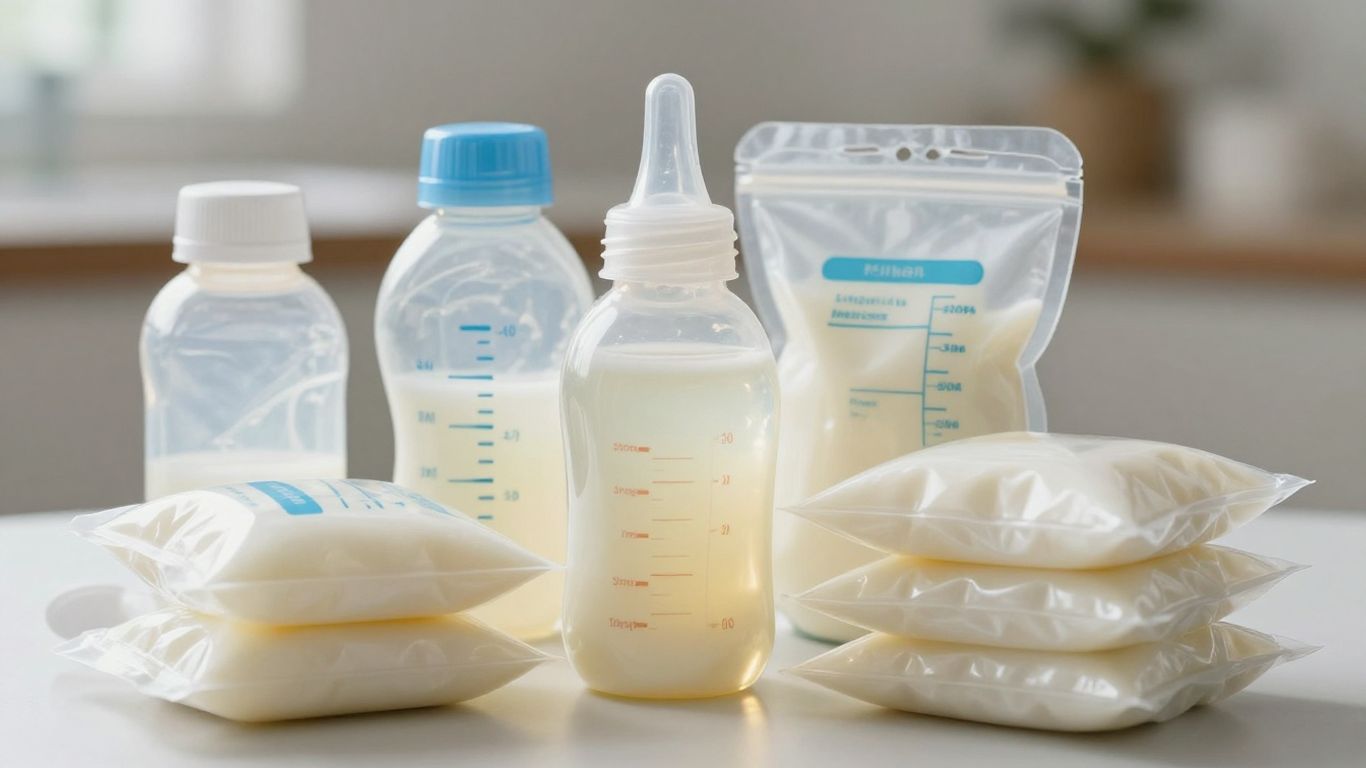
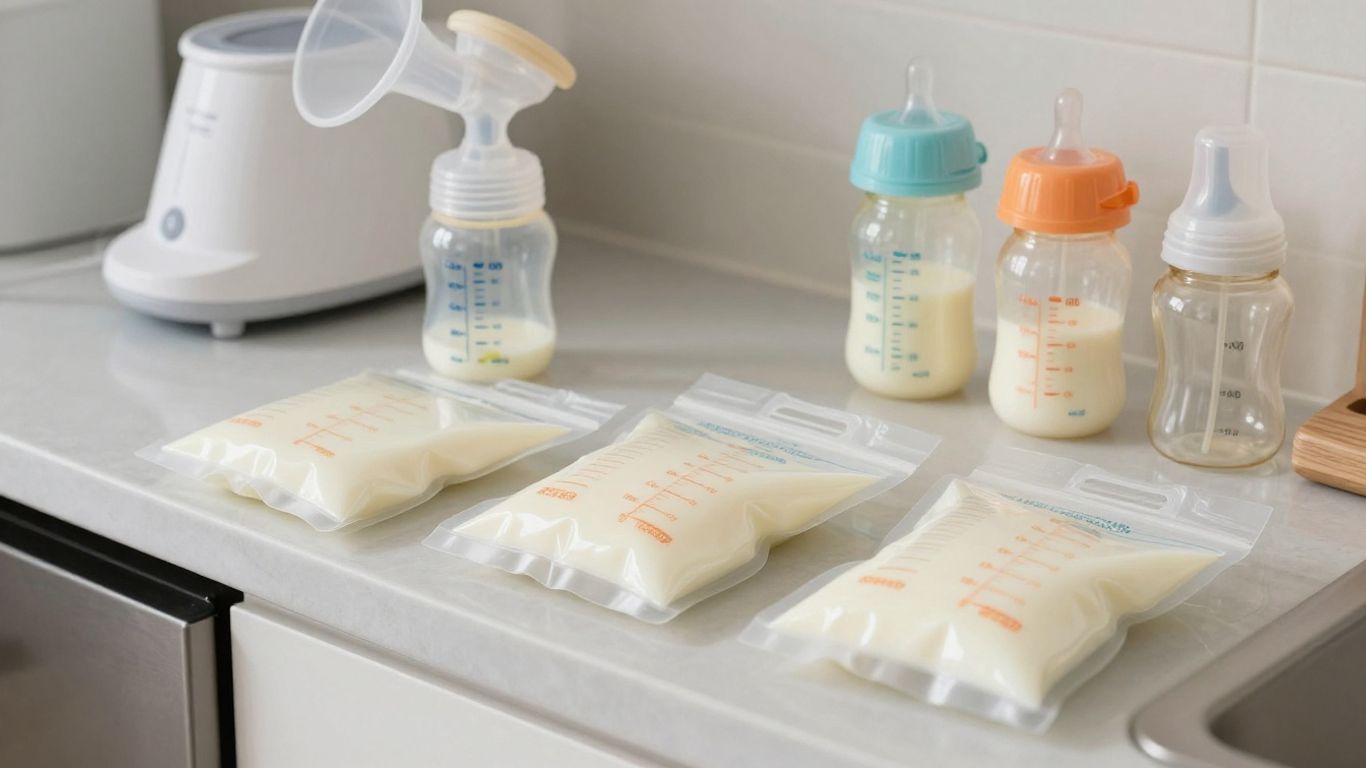
Expressing breast milk is a big deal, a real labor of love, and keeping that precious liquid gold safe is super important. That's where breast milk storage bags come in. They're basically specialized pouches designed to hold your pumped milk, keeping it fresh and ready for your little one. Think of them as tiny, sterile refrigerators for your milk when you can't be there to nurse directly. They've really changed the game for parents who need to store milk, whether it's for going back to work, having someone else help with night feedings, or just building up a stash for peace of mind.
What Are Breast Milk Storage Bags?
These bags are specifically made to hold expressed breast milk. Unlike regular food storage bags, they're built with safety and hygiene in mind. They're usually made from BPA-free plastic, which is a big plus, and they're designed to be tough enough for the fridge and freezer. The main goal is to keep your milk protected from contamination and spoilage, so your baby gets all those good nutrients, even when you're not around. It's all about making sure that hard work you put into pumping doesn't go to waste.
Key Features of Quality Bags
When you're looking at bags, there are a few things that really make a difference. You want bags that are:
- Durable: They shouldn't tear easily, especially when frozen.
- Leak-Proof: This is a big one. Nobody wants spilled milk!
- Sterilized: Most good bags come pre-sterilized, saving you a step.
- Easy to Label: You'll want to write the date and amount on them.
- Space-Saving: Some lay flat, which is great for the freezer.
The best bags are those specifically designed for breast milk, meeting strict safety standards.
Prioritizing Safety and Hygiene
Safety is really the top priority here. You're feeding this milk to your baby, so you want to be sure it's as clean as possible. Bags designed for breast milk storage are made to prevent bacteria from getting in. They usually have secure seals, and it's always a good idea to check that they haven't been tampered with before you use them. Making sure you're using bags designed for breast milk storage is the first step in keeping your milk safe and sound.
Storing milk in small portions, like two to four ounces per bag, is a smart move. It means you only thaw what your baby will drink at one time, cutting down on waste. Plus, smaller bags freeze and thaw faster.
It’s also important to remember that proper storage is key to preserving the milk's nutritional value. Using the right bags and following storage guidelines helps make sure your baby gets the best possible nutrition, no matter when they drink it.
Choosing the Right Breast Milk Bags
So, you've decided to pump, and now you're staring at a wall of breast milk storage bags. It can feel a little overwhelming, right? Don't worry, we've all been there. Picking the right bags is more than just grabbing the cheapest option; it's about protecting that precious liquid gold you're working so hard to provide. Let's break down what really matters when you're making this choice.
Material and Durability Considerations
First off, what are these bags actually made of? Most are BPA-free, which is a big deal because you don't want any nasty chemicals leaching into your baby's milk. Look for bags that feel sturdy, not flimsy. You want something that can handle being jostled around in your diaper bag or freezer without tearing. Some bags are thicker than others, and that extra thickness can really make a difference in preventing leaks. It's worth checking out reviews to see which brands hold up well over time. You're looking for bags that are specifically designed for breast milk, not just any old food storage bag.
Leak-Proof Seals and Tamper Resistance
This is probably the most important feature. A leaky bag means lost milk, and nobody wants that. A good seal is non-negotiable. Many bags have a double zipper or a special locking mechanism. Test it out if you can – try to push air into the bag and see if it stays sealed. Tamper-evident seals are also a nice touch, especially if you plan to send your milk to daycare. It gives you that extra peace of mind knowing that no one has opened the bag before your baby does. You can find some great options that focus on secure milk storage.
Space-Saving Designs for Freezers
Freezer space can fill up fast, especially with all those baby essentials. Bags that lay flat when filled are a lifesaver. They stack neatly, making it easy to see what you have and grab what you need without a big icy mess. This flat design also helps the milk thaw more quickly when you're in a pinch. Some brands even have little notches or guides to help you stack them efficiently. It might seem like a small detail, but when you're trying to cram everything into a freezer, every bit of organization helps.
Exploring Eco-Friendly Options
While most breast milk bags are disposable, there's a growing movement towards more sustainable options. Some companies offer reusable silicone bags that you can wash and use again. This can be a good choice if you're looking to reduce waste. However, make sure they are easy to clean thoroughly to maintain hygiene. If you're sticking with disposable bags, consider brands that use less plastic or have recycling programs. It's a personal choice, but it's good to know there are different ways to approach milk storage. You can compare different breast milk bag brands to see what fits your needs and values best.
Preparing for Pumping and Storage
Getting ready to pump and store your breast milk might seem like a lot at first, but a little preparation goes a long way. It's all about making sure the milk you're working so hard to collect stays safe and keeps all its good stuff for your baby. Think of it like getting your kitchen ready before you start cooking a big meal – you want everything clean and in its place.
Essential Preparation Steps
Before you even think about pumping, the very first thing you need to do is wash your hands. Seriously, scrub them well with soap and water. If you're out and about and can't get to a sink, a good hand sanitizer with at least 60% alcohol will do in a pinch. This simple step is a big deal in keeping your milk clean. Also, make sure your breast pump parts are clean and, if needed, sterilized. It’s a good idea to have a routine for cleaning your pump parts after each use or at least daily, depending on the type of pump you have. This attention to cleanliness is the foundation of safe milk storage.
Gathering Necessary Supplies
So, what exactly do you need? Beyond your breast pump, you'll want your breast milk storage bags ready to go. It’s smart to have more bags than you think you'll need, just in case you pump a bit more than usual. Having a permanent marker handy is also a good idea so you can label each bag with the date and, if you like, the time you pumped. This helps you keep track of which milk to use first. You might also want a small notebook or app to jot down the amounts pumped, which can be helpful for monitoring your supply.
Ensuring a Clean Pumping Environment
Try to find a quiet, comfortable spot where you can relax. Stress can actually make it harder for your milk to let down. Make sure the surface where you'll place your pump and bags is clean. Some moms like to have a clean towel or paper towels handy to wipe up any small drips. If you're pumping at work, having a dedicated space, even if it's just a clean desk area, can make a difference. Remember, minimizing milk transfers from the pump bottle to the storage bag is also a good practice to preserve fat and calories, so pumping directly into the storage bags is often recommended if your setup allows for it [1441].
Keeping things clean and organized before you start pumping makes the whole process smoother. It reduces the chances of contamination and helps you feel more in control of your milk supply. A little bit of planning now saves a lot of worry later.
Proper Pumping and Filling Techniques
Okay, so you've got your breast milk storage bags ready to go, and it's time to actually get the milk into them. This part can feel a little tricky at first, but once you get the hang of it, it's pretty straightforward. The main goal here is to keep that precious milk clean and safe for your little one.
Pumping Directly or Transferring Milk
When it comes to getting the milk from your body into the bag, you have a couple of options. Most people find it easiest to pump into the bottles that come with their breast pump. This way, you have a container to catch the milk and can easily see how much you've collected. Trying to pump directly into the bags can be messy and might lead to spills or contamination, which nobody wants. So, pump into your bottles first.
Once you're done pumping, you'll carefully pour the milk from the collection bottles into your chosen breast milk storage bags. It’s a good idea to have your bags laid out and ready before you start pumping, so you can transfer the milk right away.
Leaving Room for Expansion
This is a really important step, especially if you plan on freezing the milk. When liquids freeze, they expand. If you fill the bag all the way to the top, the bag could burst in the freezer, and then you've got a big mess and lost milk. Nobody wants that! So, when you're pouring the milk into the bag, stop about an inch or two from the very top. This gives the milk plenty of room to expand without causing any problems. It's a simple trick that makes a big difference.
Sealing Bags Securely
After you've poured the milk in and left that little bit of extra space, it's time to seal the bag. Most breast milk bags have a special seal, often a double zipper or a fold-over top with a sticky closure. Whatever type of bag you're using, make sure you follow the manufacturer's instructions carefully. Press down firmly along the seal to make sure it's completely closed and airtight. You want to prevent any air from getting in or milk from leaking out. A good seal is key to keeping the milk fresh and safe. After sealing, it's a good habit to give the bag a gentle shake to mix any fat that might have separated, and then label it with the date and time you pumped. This helps you keep track of how fresh the milk is, and you can follow the storage guidelines for knowing when to use it.
Storing and Freezing Your Breast Milk
Okay, so you've successfully pumped some precious milk. Now what? Storing it properly is key to keeping it fresh and safe for your little one. It might seem a bit daunting at first, but honestly, it's pretty straightforward once you get the hang of it.
Refrigeration Guidelines
If you plan to use the milk within a few days, the fridge is your best bet. Just remember to pop those bags in the back, not the door. The temperature is way more stable there, which is exactly what you want. This helps maintain a consistent cold temperature, protecting the milk's quality. You can usually keep refrigerated breast milk for up to four days. It's always a good idea to label each bag with the date you pumped it, just so you know exactly how fresh it is.
Freezing for Long-Term Storage
Got more milk than you need right away? Freezing is the way to go for longer storage. When you're filling up those bags, make sure to leave a little bit of extra space at the top – about an inch should do it. This is because liquids expand when they freeze, and you don't want any bags bursting in your freezer. Laying the bags flat in the freezer is a smart move. It helps them freeze evenly and makes them super easy to stack later on. Frozen breast milk can last for about six months in a regular freezer, and up to a year if you have a chest freezer. Just be sure to place them in the back of the freezer, away from the door, for the most stable temperature. You can find some great breast milk storage bags designed for this purpose.
Optimizing Freezer Space
Freezers can fill up fast, right? Especially with all those milk bags! A neat trick is to freeze the bags flat. Once they're solid, you can stack them up like little milk bricks. This saves a ton of space and makes it way easier to see what you have. If you're really trying to maximize space, consider a dedicated chest freezer. They often maintain a colder, more consistent temperature than your fridge's freezer compartment, which is ideal for long-term storage. Remember, keeping your frozen milk towards the back of the freezer, away from the door, is always best for temperature stability. Storing milk in the back of the freezer is a simple step that makes a big difference.
Thawing and Using Stored Breast Milk
So, you've successfully pumped and stored your liquid gold, and now it's time to use it. This part can feel a little nerve-wracking, but it's actually pretty straightforward if you follow a few simple rules. The main goal here is to keep all those good nutrients intact and make sure the milk is safe for your little one.
Safe Thawing Methods
When you need to thaw frozen breast milk, the best approach is to be gentle. The safest way to thaw is by placing the bag in the refrigerator overnight. This slow and steady method helps preserve the milk's quality. If you're in a pinch and need the milk sooner, you can use a warm water bath. Just place the sealed bag in a bowl of warm (not hot!) water. You can also hold it under warm running water. Remember to swirl the milk gently before feeding to mix any fat that might have separated.
Here are the recommended thawing methods:
- Refrigerator Thawing: Place the bag in the fridge. This is the slowest but safest method.
- Warm Water Bath: Submerge the sealed bag in a bowl of warm water.
- Warm Running Water: Hold the sealed bag under warm running water.
Refrigeration After Thawing
Once your breast milk has been thawed, it needs to be used fairly quickly. If you thawed it in the refrigerator, you can keep it there for up to 24 hours. If you thawed it using a warmer method, it's best to use it within a couple of hours. Never refreeze breast milk once it has been thawed. It's just not safe for your baby. You can find more information on recommended storage times.
Avoiding Microwave Heating
This is a big one, folks. Please, please, please do not microwave your breast milk. I know it seems fast, but microwaving can create hot spots that can seriously burn your baby's mouth. Plus, it can actually destroy some of the beneficial components in the milk. It’s just not worth the risk. Stick to the gentle thawing methods we talked about. It's better for the milk and much safer for your baby.
Traveling with Breast Milk
Heading out of town with your little one, or even just for a day trip, can feel like a big undertaking. And when you add breast milk into the mix, it might seem even more complicated. But honestly, it doesn't have to be a huge stress. With a little planning, you can keep your milk safe and sound, whether you're flying, driving, or just out for a long day.
Selecting Suitable Travel Containers
When you're on the move, the last thing you want is a leaky mess. For shorter trips, sometimes just a few good quality breast milk storage bags packed into your diaper bag are enough. If you're going to be away from a fridge for a while, though, you'll want to bring along a small insulated cooler bag. Don't forget to pack some frozen ice packs to keep everything nice and cold. Breast milk storage bags are great for travel because they're designed for freezing and take up way less space than bottles. They stack easily, too. Always test your sealed bags by turning them upside down to make sure they're leak-proof.
- Insulated Cooler Bag: A must-have for trips longer than a few hours.
- Ice Packs: Reusable gel packs work well and are easy to freeze.
- Storage Bags or Bottles: Choose sturdy, reliable containers that seal tightly. Consider bags for space-saving.
Remember that liquids expand when frozen. When filling bags for travel, leave about an inch of space at the top to prevent bursting. Also, frozen plastic can become a bit brittle, so handle your bags with care.
Transporting Frozen Milk Safely
Getting your precious milk from point A to point B without it spoiling is the main goal. If you're planning to travel by car, keeping your cooler bag in the coolest part of the vehicle, like the floor, can help. For air travel, the rules are a bit more specific, but generally, you can bring breast milk through security. It's a good idea to have your milk in a soft-sided cooler packed with ice or freezer packs to maintain a safe temperature during your journey. You can find more information on transporting expressed milk.
Understanding Air Travel Guidelines
Flying with breast milk is totally allowed by the TSA, which is great news for traveling parents. You don't have to stick to the usual 3.4-ounce liquid limit for carry-ons when it comes to breast milk. Just be prepared for a little extra screening at security. The TSA officers will likely need to test your milk, which might involve X-rays or other checks. It’s helpful to let the officer know you have breast milk. Having a printed copy of the TSA guidelines with you can also smooth things over, just in case. Remember, your breast pump and its accessories are usually considered medical devices and don't count against your carry-on limits, so pack it all up! You can find more details about flying with breast milk.
Wrapping It Up
So, you've learned a lot about breast milk bags. It might seem like a small detail, but picking the right ones really matters for keeping that precious milk safe and sound. Whether you're heading back to work, going on a trip, or just want to have some extra milk on hand for late-night feedings, good storage bags make a big difference. Remember to look for bags that seal well, are easy to label, and fit nicely in your fridge or freezer. It’s all about making your breastfeeding journey a little bit easier and giving your baby the best. You've got this!
Frequently Asked Questions
What makes a breast milk bag good?
Good breast milk bags are made from safe plastic that doesn't have BPA. They should be strong so they don't rip easily and have seals that close tightly to stop leaks. Bags that can stand up on their own and lay flat are also great because they make storing and thawing milk much easier.
How do I make sure my breast milk is stored safely?
Always wash your hands before handling milk and bags. Use bags made just for breast milk that are clean and ready to use. Label each bag with the date you pumped the milk. Store it in the fridge for up to 4 days or in the freezer for longer. Make sure the seals are tight to prevent spills and contamination.
Can I pump milk straight into the storage bag?
It's usually better to pump into a bottle first and then pour the milk into the storage bag. This helps prevent spills and makes it easier to control how much milk goes in. Pumping directly into bags can sometimes lead to messes and might not seal as well.
How much milk should I put in each bag?
It's best to store milk in smaller amounts, like 2 to 4 ounces per bag. This way, you only thaw what your baby will drink at one time, which helps avoid wasting milk. It also makes the bags freeze and thaw more quickly.
What's the best way to thaw frozen breast milk?
The safest way is to put the frozen bag in the refrigerator overnight. If you need it sooner, you can hold it under cool running water, then warm water. Never use a microwave because it can heat the milk unevenly and destroy important nutrients.
Can I take breast milk on an airplane?
Yes, you can! Breast milk is allowed in carry-on bags, even if you have other liquids over the usual limit. Make sure the bags are well-sealed and consider using a cooler bag with ice packs to keep it cold during your flight. It's always a good idea to check the airline's specific rules before you fly.